Wednesday, July 20, 2016

Zucchini noodle salad

Zucchini - 4
feta cheese - 1/8 cup
grape tomatoes
olive oil/salt/pepper
lemon juice
Rosemary garlic seasoning
1 bulb garlic chopped

Drizzle tomatoes with olive oil & season with salt & pepper & the rosemary garlic seasoning. Roast tomatoes in 400 degree oven until carmelized. Spiralize zucchini (I use pampered chef spiralizer) & put in bowl. Put feta on top of zucchini. Then when tomatoes are done, add those on top. Mix lemon juice & olive oil & garlic for dressing.

NOTE: My kids LOVED this! :) Next time I make will take a better picture. It's very beautiful & would make a nice side dish for company.

Tuesday, June 21, 2016

Gift for Mom

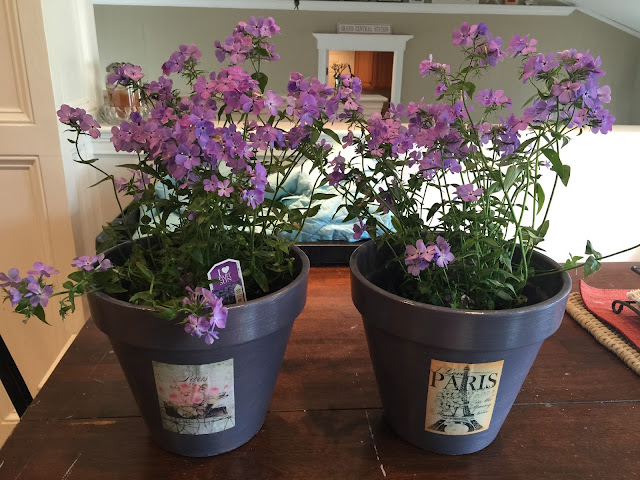
For mother's day, I picked out some pretty purple plants. Then I bought a regular ceramic planter pot & painted it a really cool purple color which I mixed with different paints. Then I decoupaged different pictures onto the pot & gave each pot a few coats of polyurethane. These came out really neat & Mom's loved them! Unique pot for a pretty plant!


Sunday, May 1, 2016

Trash to treasure: old wall picture to chalk board

I sadly did it again & failed to take a picture of this chalkboard before I started painting it! I may have one somewhere, if I find, I will post. Anyway, this was an OLD, RATTY wall hanging. The frame was dingy, cracked, dirty etc. It had in it an old map which was just haphazardly placed there! I first washed the whole thing good. I then sanded it & washed again. Then, I filled the cracks with calking, let dry & sanded it again. I then taped the frame part off & painted 2 coats on the glass with black chalkboard paint. Then when that was dry, I taped the chalkboard part off & painted the frame an oat/creamcolor with the chalk paint. When that was dry, I painted with a dry brush just over some areas (brushed) a metallic gold. Here is the finished project which I plan to use in my kitchen in my new beach home!

After chalk paint, before frame is painted:

Finished & ready to go on my kitchen wall! :)


Trash to treasure

Grungy, tacky mirror made into a cute beachy mirror! Also, a VERY old, cracked, wall hanging that had an old map in it. I decided to make it into a chalkboard for my kitchen!

The beach mirror originally had a gold frame & was very tacky! Instead of tossing it, I mixes a bit of grey acrylic paint with some oat chalk paint. I put 2 coats on the frame (after taping the mirror part with painting tape). I then distressed the painted part in various parts. I then put a layer of wax paint over it to set. Wallah! Here it is:


This looked fantastic when I peeled the painting tape off! From tacky to beachy! :)

Plain vase to shabby chic vase

I took a plain turquoise vase that I thought was ho-hum & painted it & made it shabby chic! I mixed turquoise, grey acrylic paint & added some oat chalk paint. I painted the entire vase & let dry. Then I printed a graphic I thought would look nice & decoupaged over the top! Sadly, another example I didn't take a picture of before. Very happy with the results! I think I'm going to use it to put cooking utensils in!


New Life for an old stool

I took this dirty, cobweb filled, paint-peeling, grungy stool & washed it good! I then sanded it down, gave it a coat of paint & let it dry. I then put another coat of a different color as a wash it & let this coat dry. I then decoupaged a graphic I found on the internet over the top. Wallah! This is the before & after ~

BEFORE:


Thursday, April 7, 2016

Refreshing old decor

We just bought a house in Maine which needs a ton of work. My hubby is a contractor, so he will be renovating it as soon as possible. We also went through the entire inside of the house, it was filled with junk, old items, dirty items & trash! We threw some out, but I set aside items that I could revamp & use to decorate the newly renovated home!

Unfortunately, I didn't take a picture of the before of this cutting board. Let's just say it was scratched, had a terrible, hideous graphic on it & was grimy as well. I took it home & decided to give it a good wash, then I chalk painted it a cream color which I then distressed with sandpaper. I printed out a few graphics. One graphic I found on the internet & the other I made on a word document. I proceeded to decoupage the 2 graphics onto the cutting board. I think it looks great now & would make a great decoration for the new home!


I also washed out a plain mason jar I found there & decided to paint a nantucket blue/gray color. I made the color with a blueish black acrylic mixed with a cream chalk paint. I painted jar, let dry then distressed with sandpaper. I then added some brown string around the top & a salt dough ornament to the jar, one I previously made . I plan to put dry flowers (hydrangeas?) in when I use for decor. 


I like how they came out! Trash to treasure! I promise to start taking before pics so you can see difference.  Here are items together:


Friday, April 1, 2016

Quick caprese salad

Ripe tomatoes
red onion
romaine lettuce
mozzarella cheese
fresh basil
cucumbers
avocado (if desired)


Garlic herb butter for Steak

My family loves this seasoning when I cook steak for them. I use it while cooking the steak & also brush some on with a brush after it's done cooking & on the platter. It's so easy too!

In food processor blend:

1 stick Butter (softened)
3-4 cloves of garlic
dash of salt/pepper
dash of oregano
about 1 tbsp rosemary seasoning

Blend until smooth.


Thursday, March 31, 2016

Chalk painting wood candlesticks

I found some plain wood, boring candlesticks & decided to chalk paint them. I painted them with chalk paint mixed with a little beige acrylic. I waited for them to dry then distressed them by rubbing a nail file in various places to rub the paint off. I think they look pretty cool. Decorations on the cheap!


Turning regular jars into cute containers

I took 2 regular food jars, washed them & decided instead of recycling, I'd make use of them. The cap was already black, so I didn't have to paint that. I washed the packaging off well. I then hot glued a knob to the top. Then I hot glued some raffia wrap to the body of the jar. Be careful here, you could burn yourself - I did! :( I finished it with stringing some of the painted salt dough ornaments I made a few weeks ago & wallah! A cute container!


Tuesday, March 29, 2016

changing up home decor

I had a hanging planter that was pretty, but I it had snowflakes & was white & a bit rusty. I wanted to change this planter to something crafty/artsy/beachy, so I painted it & hot glued on some of the salt dough ornaments I made (see previous post). I can't wait to add some dry hydrangeas to this & hang! The first one you can see some coasters that I painted & decoupaged starfish to also. It's great to take old, tired items & make into something new! Recycling! :)


Monday, March 21, 2016

Mexican Bean Soup

I kind of combined 2 recipes for this soup, but my husband absolutely loved it! It was so quick & healthy!


1 package frozen corn 
1 small onion chopped
1 can black beans rinsed
1 can large kidney beans rinsed
2 cans rotel (kind w/chilies)
6 cups chicken or vegetable broth
1 can enchilada sauce
1-2 cups tubetti or other small soup pasta
2 tsp cumin
1 tablespoon chili powder
Cilantro, salt, pepper, coriander if wish
You may also add sauteed peppers if you wish (I didn't because hubby doesn't like)

Saute onion, add other ingredients except pasta, which you add last. Cook till pasta is tender & soup is warm. You can serve with tortilla chips, shredded cheddar, soup cream etc. if you choose.

~ Enjoy! 


Wednesday, March 16, 2016

Salt dough Crafts

Easy salt dough recipe:

1 cup flour
1 cup salt
1/2 cup water
Mix and roll out with rolling pin. Shape as you wish, or cut out with cookie cutters. You can also stamp the dough to make embossed design.


Bake 250 for a few hours until hard. Cool & paint if you wish.


You can use these for:

Kids dough crafts, Christmas ornaments, ornaments for gift bags, decorations for the home, etc.


I will show ornaments I made, then will update when I use these ornaments in various ways. :)


Monday, February 1, 2016

EASY Pasta Salad Appetizer for a crowd


Ingredients: 

Broccoli
Salami
Red & Yellow cherry tomatoes
button mushrooms
Artichoke hearts marinated
hearts of palm
chunks of cheese
parmesan shredded cheese
Mozzarella balls
salad dressing
Cooked tortellini
Green & black olives

I use as much as each item as I see fit. It's up to you how much you'd like to use. Cut all items into bite size pieces & toss with dressing
Sprinkle with a little parmesan cheese & toss again. You can serve with toothpicks if cut into larger pieces, or serve as a pasta salad.

Enjoy!